How I Shot This: Calvin Klein Campaign
Concept
Published: Chang, Ian. “Hong Kong Rooftop.” Mén’s Cruze Magazine, June 2020, vol. 5, Jun. 2020, pp. cover, 11-20, back.
Myth: it’s not about the gear.
But damn… having the right equipment on set would prevent hours of logistical headaches.
Rewind: I’ve always wanted to shoot a black and white men’s fitness campaign. The inspiration comes from an old Dirk Bikkembergs poster I saw during my undergraduate years. The photographer’s name evades me, but what I recall is the powerful posture of a soccer team (read: football to the rest of the world), standing on a Bikkembergs platform, wearing the namesake tighty-wighties, and exuding enough testosterone to make Heracles blush. Fast forward.
Hong Kong.
Two weeks left on my modelling contract and I’ve finally assembled a team of six models for my Calvin Klein photoshoot. Two days earlier, I spend a day visiting various CK boutiques before finding one with six identical pairs of black, medium boxer-briefs. T-minus 1 day, and I learn of a photography ban on the original rooftop of choice. To my grief, I hastily source a private penthouse garden overlooking Kowloon City and Lion Rock.
I tell myself that things will be ok. What’s the worst that could happen?
Those who read my other how-to articles know of my minimal travel kit, consisting of:
one DSLR
50mm prime
speedlite
LED panel
collapsible reflector
Before lamenting about all that’s unfair with this world and woe is me… here is the final photo:
Alright, let the lamenting commence!
Problem One: Broken camera.
Before a single frame is taken and literally just as I’m coming down from the tripod (elevated to its max height of 6’), I hear a bone-chilling SNAP. Turning around, I gawk as the Canon 1D X barrels down in slow motion, taking a mid-air CRACK on the patio table, and crashing into the wet floor. The 50mm prime POPS off the mount and rolls towards our equally-shocked models.
Solution: Cry in a corner?
My face is wet only from the rain. I swear.
Upon inspection, the DSLR’s tripod threads have stripped, causing it to dismount - totally nailed that landing though. Good news: it still takes photos. Bad news: the lens’s metal mount is loose and the focusing ring now has some play. After prayers and frantic assurance to the models that their day of fasting/sit ups/push ups aren’t wasted, I realize that if held firmly against the camera body, the lens still shoots and records files/EXIF data.
So that’s what I do for the session. Tripods - who needs ‘em.
Problem Two: Wide angle with 50mm.
Although incredibly large by Hong Kong standards, the rooftop garden still requires at least 24mm to fit the entire group. Even with my back against a wall, framing only accommodates the height of a single model.
Solution: Stitch.
Expose for multiple rows and stitch them together in Photoshop. Some liken this to the Brenizer Method - which I personally love - but the goal isn’t to achieve a razor thin depth of field. I start with a series of “template” shots: 3 rows of 10. Afterwards, individual full length photos are taken of each model, with another model (not in the photo) holding the reflector - the best of each which will be edited into the template.
Problem Three: Constantly changing weather.
The first photo is taken under cloudy conditions. As I move towards the last model, the weather quickly changes to sunset… followed soon after by rain. Lovely.
Solution: Exposure correction in post.
With all settings locked in (aperture, shutter speed, ISO, white balance), and “thread gate” still fresh in mind, I don’t have the time nor excess mental capacity to divert towards “checking the histogram between shots”. This, of course, will later bite me in the ass. But remember: the lens is being physically held in place as I shoot. The rain will become its own nuisance during post processing when individual ‘streaks’ of rain require editing.


Yet what holds this shoot together isn’t my rapid-fire expletives nor a barely held composure tipping into insanity. It’s the enthusiasm and camaraderie of six models, and their idiot photographer, who want to lift a project to its highest quality - broken equipment and all. Those who aren’t in front of the lens act as lighting assistants, aid in directing, or are re-applying baby oil for the fifth time. Even for international models, we only get better by: (1) learning from our mistakes, and (2) guiding those less experienced. What makes this team so bloody amazing? Some hypotheses:
The adrenaline of being over 150m/500ft above Hong Kong.
Our bodies reaching ketosis after 24h of fasting.
Baby oil. Becoming one with the baby oil.
Just a bunch of stand up dudes.
I choose: All of the above. Final answer, Regis.
Gear
Camera: Canon EOS-1DX Mark I (à la stripped tripod thread)
Lens: Sigma 50mm f/1.4 DG HSM Art
Oil: Baby
Lighting
Key: Sun + unreliable cloudy diffusion
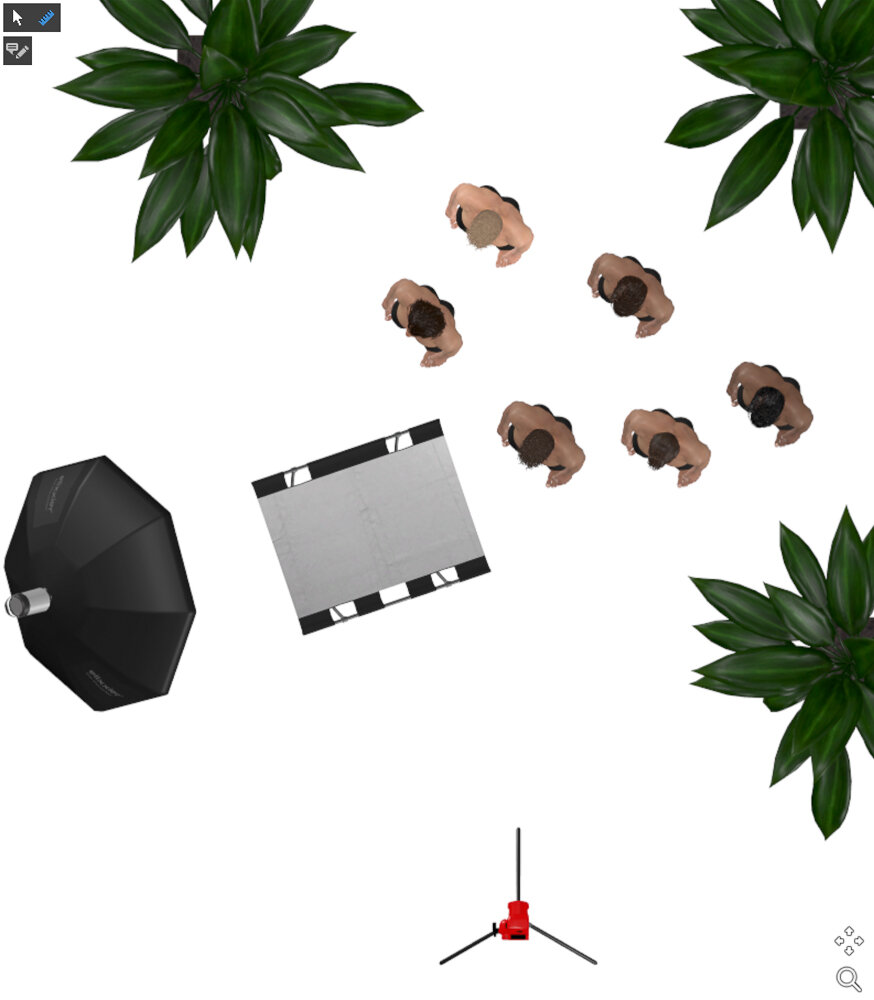
Fill: Westcott 30” Silver Reflector
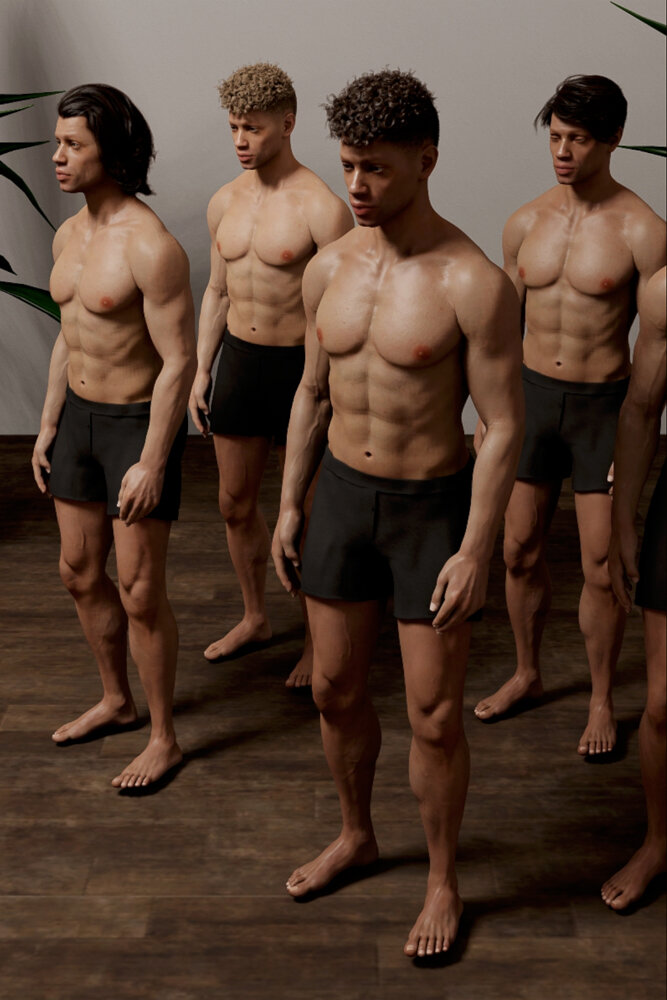
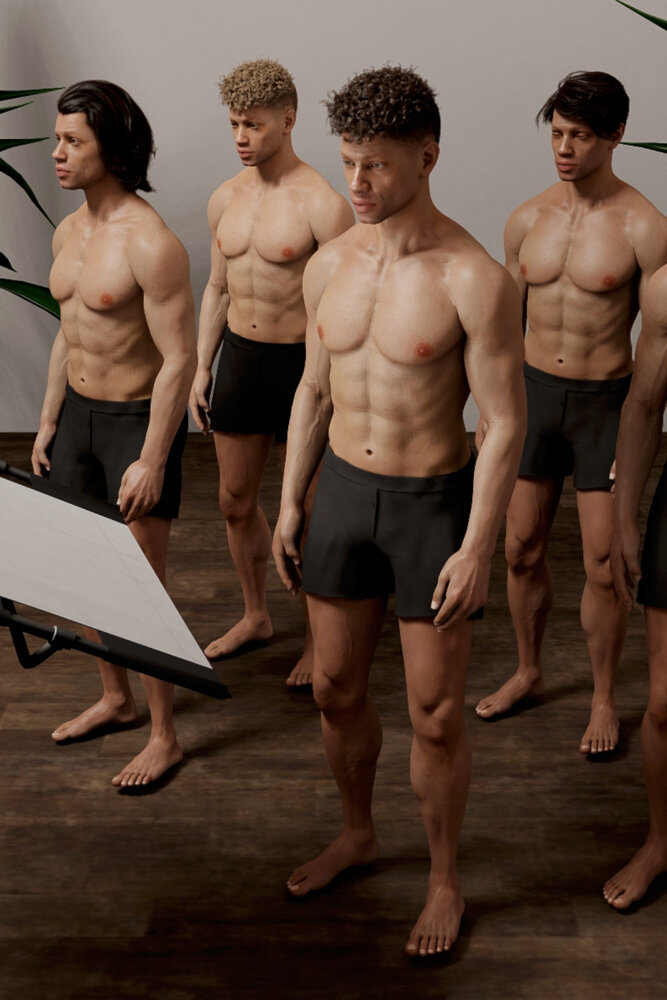
The following renders, created in Set a Light 3D, are very comparable to the subsequent SOOC image. Replicating the sun with a large octobox, our only light manipulation comes from the silver reflector. Even with the accentuated specular highlights, catchlights, and shadow fill, a major problem will be how dark the legs appear by virtue of not having this extra light (scroll down to see B+W conversion, prior to dodging). Just adding to a growing laundry list of things “to be fixed in post”.
Editing
Step 1: Cull, correct, and combine.
As we already know, with ever-changing weather/lighting conditions, so too will the appearance of our RAW files. Prior to creating the 30-photo stitch, all selected images first have lens corrections applied (LR profiles + remove CA). White balance and exposures are adjusted by eye for consistency and then taken into Photoshop for merging into a ‘panorama’. After that, the best shot of each individual model is aligned and painted in.
The individual photos are taken for two reasons. (1) everybody has the chance to ‘give their best shot’, and (2) I refocus every time, ensuring that all subjects in the final photo are tack sharp. This is unlike shooting the template, where I focus on the closest model, lock, and proceed to capture three rows of ten images. I’ve made the mistake in my wedding days where I’d stop down for a group photo and only after stitching realize that just the front row is in focus. Bad Ian.

EXIF/Merge to Panorama in PS
Photos Combined: 30
Focal Length: 50mm
Shutter Speed: 1/125s
Aperture: f/4.5
ISO: 400
Step 2: Correct (again), crop, and convert.
The distortion is severe, especially in the lower third. Our two closest models have comically stretched legs, thanks to the stitching algorithm. All is remedied with a combination of Lightroom’s transform tools, Photoshop’s perspective warp, and a healthy dose of cropping. After processing in black and white, it becomes visually clear what’s required in Photoshop. Here’s my thought process…

Photoshop Round 1:
Overexposed Hong Kong skyline - Burn
Faces underexposed - Dodge
Scars - Healing Brush
Clipped Highlights - Clone Stamp
Inconsistent depth of field - Blur
Different light quality - Dodge
Distracting bush - Blur
Distracting rope - Healing Brush
Logo unclear - Dodge + Sharpen
Underwear too dark - Dodge
Distracting rocks - Healing Brush
Legs underexposed - Dodge
Distracting lights - Burn
Boring floor - Vignette
Distracting pot - Clone Stamp
Step 3: Peer review (optional).
After I’m done investing multiple hours into a single photo, I feel it’s in my best interest to have fresh eyes critique my final edit - or at least what I think is my final edit. Contacting long time friend and colleague, Sam Tsang, we have a Zoom meeting (at the time of writing, planet Earth is undergoing a pandemic) to review my Calvin Klein group photo.
Some benefits of peer review are:
From another perspective we uncover details otherwise missed.
It informs our decision making process regarding what does or doesn’t work.
If they say your work is shit, then you need to understand where that thought process comes from. We also need to ask ourselves: “Is my work truly bollocks?” or “Do I just make terrible friend choices?”
Seek the advice of someone better/more experienced in the niche - approach this as a learning experience. Like a buffet, you don’t have to take everything offered, but at the same time, don’t be a picky child - consider all suggestions. Alas, we magnify to 100% and pixel peep - below are all of Sam’s recommendations.
By the end, it’s more of a black and red image, rather than black and white.

Photoshop Round 2:
Flyaway hairs - Healing Brush
Dark patches of hair - Dodge
Shoulder orientation - Liquify
Creases, wrinkles, scars, spots, pimples, blemishes - Healing Brush
Undefined muscle - Dodge + Burn
Blurry, inconsistent DOF - Sharpen
Blending artifact - Clone Stamp
Distracting bush (still) - Blur
Distracting rope - Clone Stamp
Distracting lights - Clone Stamp
Boring floor - Dodge + Burn
Closing
In conclusion, I’m very happy with the final product, considering the limited equipment and unforeseen complications. Although the post-processing became a love/hate ordeal, knowing that new skills are added to the toolbox make it all worthwhile. I cannot express enough gratitude towards the 6 models for taking time away from castings and seriously preparing for the shoot - it’s not as common as one might think.
The big “if”.
If all variables can be controlled and I’m blessed with an army of assistants, an exhaustive selection of studio equipment, and an app to control the weather… this is what I’d do differently:
Shoot on a rooftop with minimal barriers or trees, thus allowing a greater view of the city below.
Completely scrim off the the sun and use a huge silver parabolic umbrella as key light.
A 6’ white v-flat as fill, from head to toe (or large octabox).
Strobe with reflector as rim light.
A camera where the threads won’t strip - mount on tripod.
Still shoot with 50mm (I like compression) and stitch in post.
Tethering.
A bucket of soapy water to wash baby oil from floor.
Looks like I’ve set out plans for my next shoot!
To my creatives: go out and get your oil on!
The Team
Photographer/Stylist: Ian Chang Photography
Models: Andre, Christian, Dakota, Guilherme, Luke, Nicholas
Publication: Men’s Cruze Magazine